Cisco ASA TACACS+ Configuration – CLI
In order for our network devices to operate with the device admin feature and use TACACS+, a number of commands are required.
In this lesson, we’ll break down the required ASA TACACS+ configuration step-by-step. Once we’ve finished, our devices will be ready to use the device administration feature.
For this lesson, we’ll be breaking down the configuration required using the CLI. If you’d like to
configure TACACS+ using Cisco ASDM, you can follow along using the upcoming lesson.
Overview
Like other Cisco products, the ASA can utilise TACACS+. In turn, this can be used to control access.
By default, our Cisco ASAs require TACACS+ enabling. In addition to this, we need to tell them where to send the TACACS+ communicate to.
ASA TACACS+ Configuration – CLI
The quickest and easiest way of applying configuration to an ASA is via the CLI.
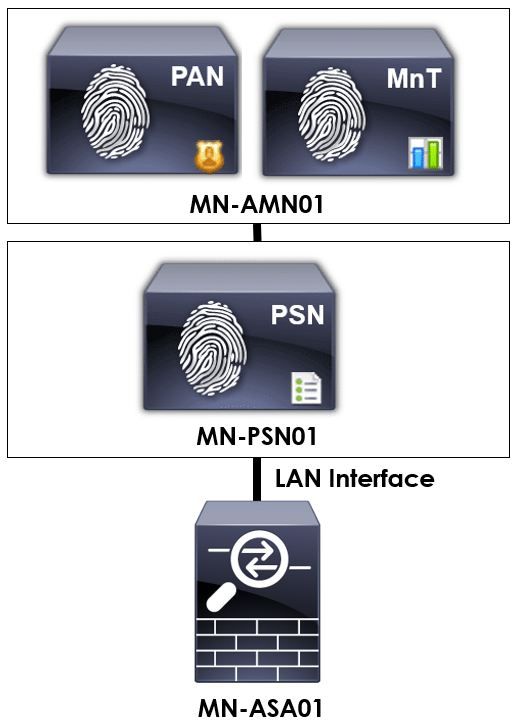
In order to provide some context to the configuration we’re applying, I’ll be using the topology below.
aaa-server MN-TACACS+ protocol tacacs+
!
aaa-server MN-TACACS+ (LAN) host 192.168.10.1
key M1X3DN3TW0RK5
!
aaa-server MN-TACACS+ (LAN) host 192.168.10.2
key M1X3DN3TW0RK5
!
aaa authentication enable console MN-TACACS+ LOCAL
aaa authentication http console MN-TACACS+ LOCAL
aaa authentication serial console MN-TACACS+ LOCAL
aaa authentication ssh console MN-TACACS+ LOCAL
!
aaa authorization command MN-TACACS+ LOCAL
aaa authorization http console MN-TACACS+
aaa authorization exec authentication-server auto-enable
!
aaa accounting command MN-TACACS+
aaa accounting enable console MN-TACACS+
aaa accounting serial console MN-TACACS+
aaa accounting ssh console MN-TACACS+
aaa-server MN-TACACS+ protocol tacacs+
First of all, we need to create our TACACS+ group. We can achieve this using the aaa-server MN-TACACS+ protocol tacacs+ command. MN-TACACS+ can be replaced for the name of your group.
This group will contain our TACACS+ servers and will be referenced further in our configuration.
aaa-server MN-TACACS+ (LAN) host 192.168.10.1
key M1X3DN3TW0RK5
!
aaa-server MN-TACACS+ (LAN) host 192.168.10.2
key M1X3DN3TW0RK5
Next, we need to add our TACACS+ servers to the group we’ve just created. There’s a few bits happening with this command, so let’s break it down.
Our servers can be added using the aaa-server command. Following this, we specify the group we want to add the server to; MN-TACACS+. The (LAN) syntax specifies the interface
on our ASA used to access the server. Finally, we specify the IP address of our server using host 192.168.10.1.
Repeat this for each server you want to add to your TACACS+ group.
aaa authentication enable console MN-TACACS+ LOCAL
aaa authentication http console MN-TACACS+ LOCAL
aaa authentication serial console MN-TACACS+ LOCAL
aaa authentication ssh console MN-TACACS+ LOCAL
We’ve now created our TACACS+ group that contains our AAA servers. As such, the next step is to configure our AAA parameters. We’ll start with authentication.
We can be extremely granular and control which methods use TACACS+ and which use local authentication. In our example, I’ll enable AAA to point authentication requests to TACACS+ on the following:
AAA can be enabled for authentication using the aaa authentication command. Following this, the method of authentication we want to enable AAA for, e.g. enable.
Next, we need to tell our ASA where to send the AAA authentication requests. This is achieved using console MN-TACACS+. Remember, this is the group we created previously and assigned the servers too.
Finally, as a fallback method, we can use local authentication in the event our TACACS+ servers are unavailable. This is achieved by specifying LOCAL at the end of our commands.
aaa authorization command MN-TACACS+ LOCAL
aaa authorization http console MN-TACACS+
aaa authorization exec authentication-server auto-enable
When TACACS+ is used, we can maintain granular control of each command that’s ran.
First, we’ll enable AAA authorization on all consoles using the aaa authorization command. Following this, we’ll specify our group; MN-TACACS+. Finally, we’ll fall back to local authentication using LOCAL in the event our servers are unreachable.
Next, we’ll enable authorization for all commands ran via ASDM. This is achieved using aaa authorization http console MN-TACACS+.
Finally, we’ll also configure authorization for all exec commands that are ran. We achieve this using the aaa authotization exec command. This command is slightly different in that we then use the authentication-server command to use our remote TACACS+ servers. Last of all, the auto-enable command will sure that all CLI sessions go straight to exec mode once authentication.
aaa accounting command MN-TACACS+
aaa accounting enable console MN-TACACS+
aaa accounting serial console MN-TACACS+
aaa accounting ssh console MN-TACACS+
The final thing for us to configure is our accounting. This will send all actions and commands executed on our device to our TACACS+ servers.
We can enable accounting using aaa accounting command. Following this, the name of our group; MN-TACACS+.
The final step is to configure which methods we want setup accounting for. This is achieved using the aaa accounting X console command followed by the name of our group; MN-TACACS+. The X in our
example is replaced with the method of access, e.g. enable.