Cisco IOS TACACS+ Configuration
In order for our network devices to operate with the device admin feature, a number of TACACS+ commands are required.
In this lesson, we’ll break down the configuration step-by-step. Once we’ve finished, our devices will be ready to use the device administration feature.
Overview
By default, our Cisco IOS devices require TACACS+ enabling. This is achieved using AAA configuration. In addition to this, we need to tell our devices where to send the TACACS+/AAA communicate to.
The configuration applied to IOS devices uses AAA:
As we proceed through the lesson, we’ll be using the topology outlined below. The will help you understand the setup as we apply the configuration to our device.
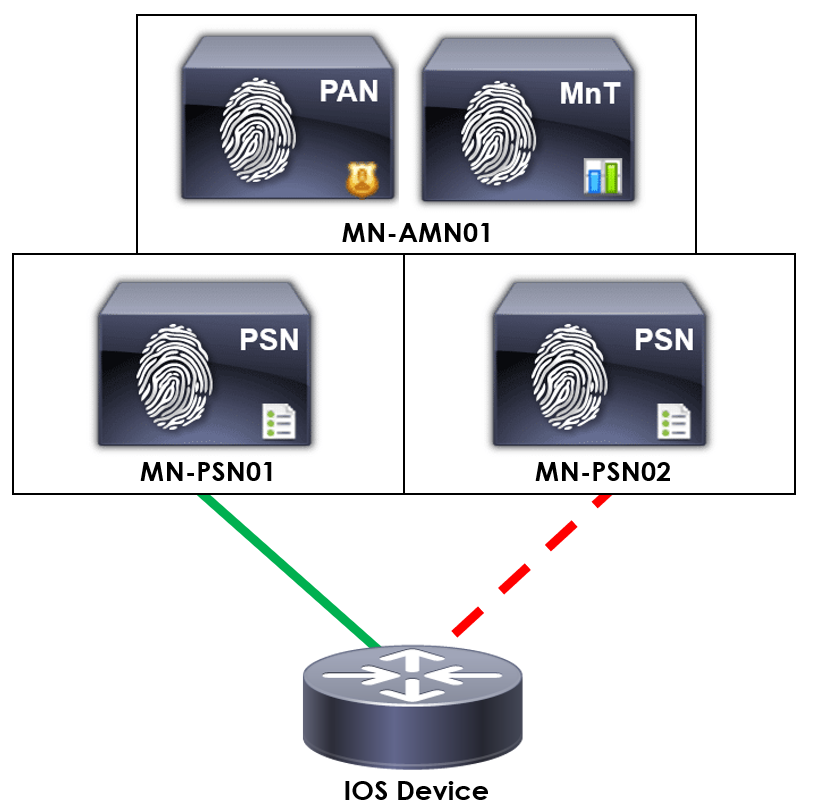
It’s worth noting that the configuration may vary slightly depending on the version of IOS on your device.
IOS Configuration
We’ll start by taking a look at the configuration as a whole. From here, we’ll then break down each section of the configuration.
Before you proceed with the configuration, I highly recommend you configure a local account on the device. There are a number of key reasons for this:
In addition to this, if the configuration is being applied remotely, ensure VTY access is configured.
aaa new-model
!
tacacs server MN-PSN01
address ipv4 192.168.10.1
key M1X3DN3TW0RK
tacacs server MN-PSN02
address ipv4 192.168.10.2
key M1X3DN3TW0RK
!
aaa group server tacacs+ MN-TACACS+
server name MN-PSN01
server name MN-PSN01
!
aaa authentication login default group tacacs+ local
!
aaa authorization config-commands
aaa authorization commands 1 default group tacacs+ local
aaa authorization commands 15 default group tacacs+ local
aaa authorization exec default group tacacs+ local
!
aaa accounting commands 0 default start-stop group tacacs+
aaa accounting commands 1 default start-stop group tacacs+
aaa accounting commands 15 default start-stop group tacacs+
aaa new-model
The aaa new-model command is used to enable the AAA features on our device.
As mentioned before, ensure that a username and VTY configuration have been applied. This ensures that you don’t loose management access to the device once this command has been applied.
tacacs server MN-PSN01
address ipv4 192.168.10.1
key M1X3DN3TW0RK
tacacs server MN-PSN02
address ipv4 192.168.10.2
key M1X3DN3TW0RK
Our next step is to configure our TACACS+ servers on the device. This is achieved using tacacs server command. Following this, the name of our server.
Next, we need to configure how our device will access our TACACS+ servers. The address ipv4 sub-command is used to specify the IP address of our ISE node hosting the device admin feature.
Finally, both our IOS device and the TACACS+ server must agree on a key, used to authenticate. We can tell our device what to use using the key command.
aaa group server tacacs+ MN-TACACS+
server name MN-PSN01
server name MN-PSN02
Once our TACACS+ server configuration has been applied, we can group them together. This then allows us to point our TACACS+ requests to the group.
We create our TACACS+ group using aaa group server tacacs+. Following this, the name of our group; MN-TACACS+.
Our individual TACACS+ servers are then added to the group using the server name command. Following this, the name of our servers; MN-PSN01 or MN-PSN02
The IOS device will send the TACACS+ request to the first available server. This is achieved in a top-down fashion. In our example, all TACACS+ requests will be sent to MN-PSN01. In the event that this is unavailable, they will automatically be
sent to MN-PSN01.
aaa authentication login default group tacacs+ local
We now need to enable TACACS+ for login authentication to our device. This is achieved using the aaa authentication login command.
The default syntax is used instead of a custom group.
Following this, the group tacacs+ syntax tells our device to use our locally configured TACACS+ servers. Remember, these are the servers configured under our previous aaa group server tacacs+.
Finally, we can allow a fallback authentication method. This then allows our IOS device to use local authentication only if our TACACS+ servers are unreachable. We can enable this using using the local syntax.
aaa authorization config-commands
aaa authorization commands 1 default group tacacs+ local
aaa authorization commands 15 default group tacacs+ local
aaa authorization exec default group tacacs+ local
Now, we need to apply our authorization configuration. There are a number of commands we can enter to require each command to be authorised against Cisco ISE.
First of all, aaa authorization config-commands. This command is used to provide granular control over which configuration commands users can run.
Next, aaa authorization commands 1 default group tacacs+ local and aaa authorization commands 15 default group tacacs+ local. Both commands will authorize commands that use privilege level 1 and 15, respectively.
The local command is used to fall back to local authentication if our ISE servers are unavailable.
Finally, aaa authorization exec default group tacacs+ local. This command is used to confirm that the user has permissions to access the EXEC shell. Again, the local command is used to fallback to local authentication
if our ISE servers are unreachable.
aaa accounting commands 0 default start-stop group tacacs+
aaa accounting commands 1 default start-stop group tacacs+
aaa accounting commands 15 default start-stop group tacacs+
Our final AAA commands setup accounting on our IOS device.
Accounting can be enabled by configuring aaa accounting commands X default start-stop group tacacs+. The three commands are extremely similar, with the exception of the privilege level; 0, 1 and 15. This is in replacement of ‘X‘
in our command.