Introduction to Playbooks
In this lesson we’ll be taking a look at Ansible playbooks, how they’re used and how we create them. We’ll then be running these against our devices in the the topology.
Overview
Ansible playbooks are files formatted in YAML. These are easy to read files that contain all of the tasks we want Ansible to execute.
Playbooks are where we’ll see the real power of Ansible for configuration, deployment and orchestration.
To provide some context, let’s take a look at an example playbook:
Basic Playbook Example
We’ll start by creating our playbook:
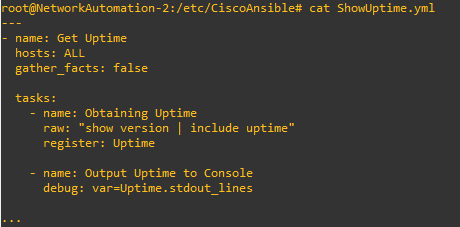
root@NetworkAutomation:/etc/CiscoAnsible# nano ShowUptime.yml
In our example playbook below, our playbook will obtain the uptime from our devices and output them to the console.
—
– name:
Get Uptime
hosts:
ALL
gather_facts:
false
tasks:
– name: Obtaining Uptime
raw: “show version | include uptime”
register:
Uptime
– name:
Output Uptime to Console
debug: var=Uptime.stdout_lines
…
The formatting of our YAML playbook is extremely important. If our playbook is not formatted correctly, it will fail to run.
The indentation needs to match our example above else Ansible will produce an error.
Let’s break down our playbook section by section:
—
– name:
Get Uptime
hosts:
ALL
gather_facts:
false
— = Every YAML file needs to start with 3 dashes (—). This indicates that our file is a YAML file and indicates the beginning of the file.
– name: = This is used to name our playbook for its required use. In this case, I’ve called it
Get Uptime.
hosts: ALL = The next line specifies the group within our hosts file we want to execute our playbook against. In our playbook, we’ll be executing our tasks against all devices in the group named ALL.
gather_facts: false = We have the ability to gather facts from our Cisco devices that can be used as variables within our playbook. This is not required within this playbook so we’ll set this as false.
tasks:
– name: Obtaining Uptime
raw: “show version | include uptime”
register:
Uptime
tasks: = Here we define the tasks that we want Ansible to execute on our devices.
– name: Obtaining Uptime = We can provide each of our tasks we want Ansible to execute with a name. This appears when out playbook is ran so that we know if the task has been a succeeded or failed. In addition to this, it helps others understand what our code is going to do.
raw: = Raw is the Ansible module that we’ll be using. These are units of code used to run commands. There are hundreds of modules available which you can learn more about here.
“show uptime | include version” = This is the command Ansible will be executing on our devices using the raw module.
register: Uptime = Once Ansible has connected and executed our command it will register the output into a variable called Uptime. We can call this whatever we like.
– name:
Output Uptime to Console
debug: var=Uptime.stdout_lines
…
– name: Output Uptime to Console = Again, we’ll provide our second task a name.
debug: var=Uptime.stdout_lines = Ansible will then use debug to print our variable to our Ansible console.
… = Finally, this indicates the end of our YAML playbook. This however is optional.
Once we’ve finished we can save the files with CTRL and X
.
We’ll then view our playbook as follows:
root@NetworkAutomation:/etc/CiscoAnsible# cat ShowUptime.yml
root@NetworkAutomation:/etc/CiscoAnsible# ansible-playbook ShowUptime.yml -u Ansible -k
Now that we understand how our playbook is formatted, we’ll run it so that we can see what it looks like.
We do this using the ansible-playbook
command. Following this, we’ll specify our playbook we’re created; ShowUptime.yml. I’ve then specified the username we want Ansible to use using
-u Ansible. Finally, Ansible will prompted us for the password by using the -k argument.
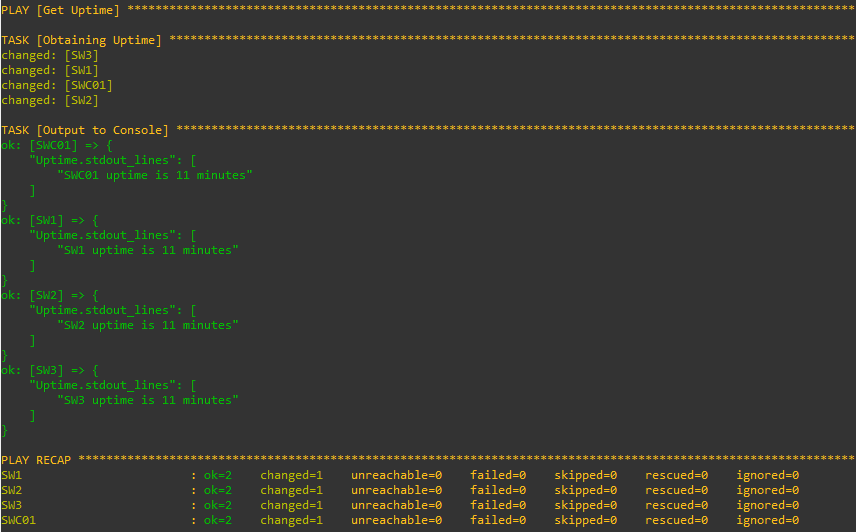
Ansible has connected to our devices, obtained the uptime and output the results to our Ansible console.
Let’s break down the output so that we understand how our playbook has been ran.
Firstly, our Ansible indicates the play that’s in progress. This is the name we assigned here in the playbook:
—
– name:
Get Uptime
hosts: ALL
gather_facts: false

Ansible then runs the first task in our playbook. It will connect to each device under our ALL group within our hosts file using SSH. From here, it then executes the show version | include uptime
command and stores this in our Uptime variable.
The associated playbook configuration is below:
tasks:
– name: Obtaining Uptime
raw: “show version | include uptime”
register:
Uptime
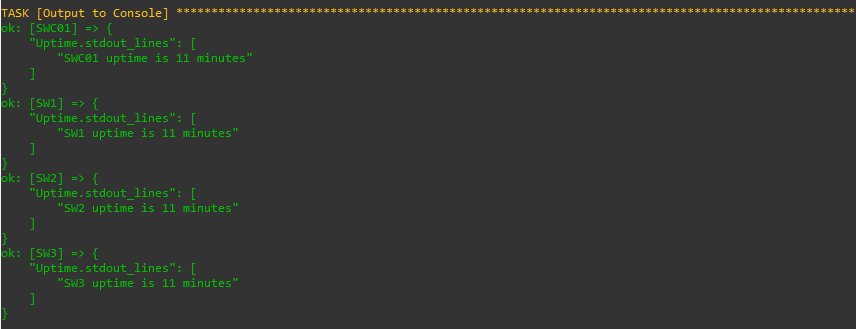
The content of our variable is then output to our console. The variable contained the output from all of our devices.
The associated playbook configuration is below:
– name:
Output Uptime to Console
debug: var=Uptime.stdout_lines
…

Finally, if Ansible fails to connect to any of our devices or the commands fail the run, these will be shown in our PLAY RECAP at the bottom.
Advanced Playbook Example
You’ve now seen how an Ansible playbook is constructed and ran.
Let’s create our own playbook and run through it section by section. This time we’ll be creating a playbook to create a new user account on our devices. We’ll then export our running-configuration to our Ansible console to confirm that it’s been created.
We’ll start by creating our playbook:
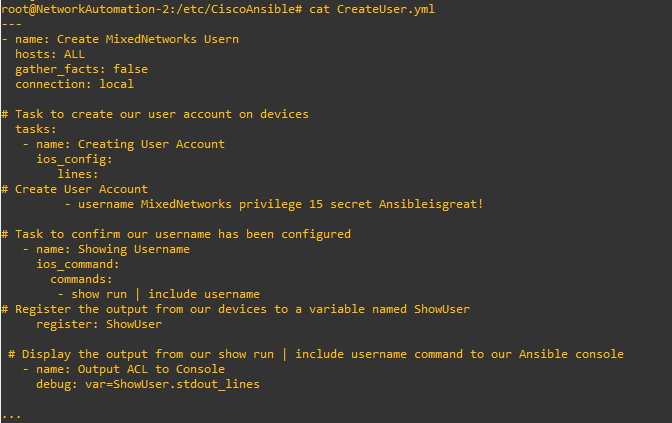
root@NetworkAutomation:/etc/CiscoAnsible# nano CreateUser.yml
To make it easier to read, I’ve colour coded our YAML file accordingly.
—
– name:
Create MixedNetworks Username
hosts: ALL
gather_facts:
false
connection:
local
# Task to create our user account on devices
tasks:
– name:
Creating User Account
ios_config:
lines:
# Create user account
– username MixedNetworks privilege 15 secret Ansibleisgreat!
# Task to confirm our username has been configured
– name:
Showing Username
ios_command:
commands:
– show run | include username
# Register the output from our devices to a variable named ShowUser
register: ShowUser
# Display the output from our show run | include username command to our Ansible console
– name: Output Users to Console
debug:
var=ShowUser.stdout_lines
…
Let’s break our playbook down again so that you understand the process:
—
– name:
Create MixedNetworks Username
hosts: ALL
gather_facts:
false
connection: local
— = Our YAML file needs to start with 3 dashes (—). This indicates that our file is a YAML file and the beginning of the file.
– name: = To start with, we’ll provide our playbook a name – we’ll call this one Create MixedNetworks Username.
hosts = We’ll then indicate to Ansible which group in our inventory we want Ansible to execute the tasks against. In this instance, we’ll execute them against our devices in the ALL group.
gather_facts: false = There’s no requirement to gather information from our devices. As such, we’ll set this as false.
connection: local = Lastly, we’ll use connection:local to indicate that we want to run the commands in privilege mode.
# Task to create our user account on devices
tasks:
– name:
Creating User Account
ios_config:
lines:
# Create user account
– username MixedNetworks privilege 15 secret Ansibleisgreat!
# Task to create our user accounts on devices = In our playbook we’ll be adding comments to help others understand our code. Comments are added using # at the start of our line. Lines starting with # are ignored by Ansible.
tasks: = Here we’ll define the tasks that we want Ansible to execute.
– name: Creating User Account
= We’ll name our first task Creating User Account. This will appear when the playbook is ran and also assists in understanding the use of the code.
ios_config: = To action our first task we’ll be using the ios_config module. This module will apply the commands in configuration mode on our devices.
lines: = The commands we want Ansible to apply to our devices are listed under our lines section.
# Create user account
= I’ve added a comment to make others are that the following commands are required to create the user account.
– username MixedNetworks privilege 15 secret Ansibleisgreat!
= Finally, we’ll indicate the command we want Ansible to configure on our devices.
# Task to confirm our username has been configured
– name:
Showing Username
ios_command:
commands:
– show run | include username
# Register the output from our devices to a variable named ShowUser
register: ShowUser
# Task to confirm our username has been configured = Once again, we’ll add a comment explaining that the upcoming code is used to show confirm our username has been created on our devices.
– name: Showing Username = We’ll now define the name of our second task Ansible will be executing. We’ve called this one Showing Username.
ios_command: Next, we need to specify the module we’ll be using. Unlike before, we don’t need to make configuration changes to our device. As such, we’ll be using the ios_command to run commands in privilege mode.
commands: = The ios_command requires us to enter the commands Ansible will execute under commands:.
– show run | include username
= We’ll specify the command we want to run, in this instance we want to run show username | include username.
# Register the output from our devices to a variable named ShowUser = As before, we’ll create a comment to explain that the next command will register the output of show run command to a variable.
register: ShowUser = We’ll then register the output from our show run command to a variable called ShowUser.
# Display the output from our show run | include username command to our Ansible console
– name: Output Users to Console
debug:
var=ShowUser.stdout_lines
…
# Display the output from our show run | include username command to our Ansible console = Again, we’ll comment our code to help others understand the code.
– name: Output Users to Console = We’ll give our final Ansible task as name.
– debug: var=ShowUser.stdout_lines
= Finally, Ansible will print our output the our Ansible command line.
Once we’ve finished we can save the files with CTRL and X
.
We’ll then view our playbook as follows:
root@NetworkAutomation:/etc/CiscoAnsible# cat CreateUser.yml
root@NetworkAutomation:/etc/CiscoAnsible# ansible-playbook CreateVLAN.yml -u Ansible -k
Now we’ve created our playbook, let’s run it!
As before, we do this using the ansible-playbook
command. Following this, we’ll specify our playbook we’re created; CreateUser.yml. I’ve then specified the username we want Ansible to use using
-u Ansible. Finally, Ansible will prompted us for the password by using the -k
argument.
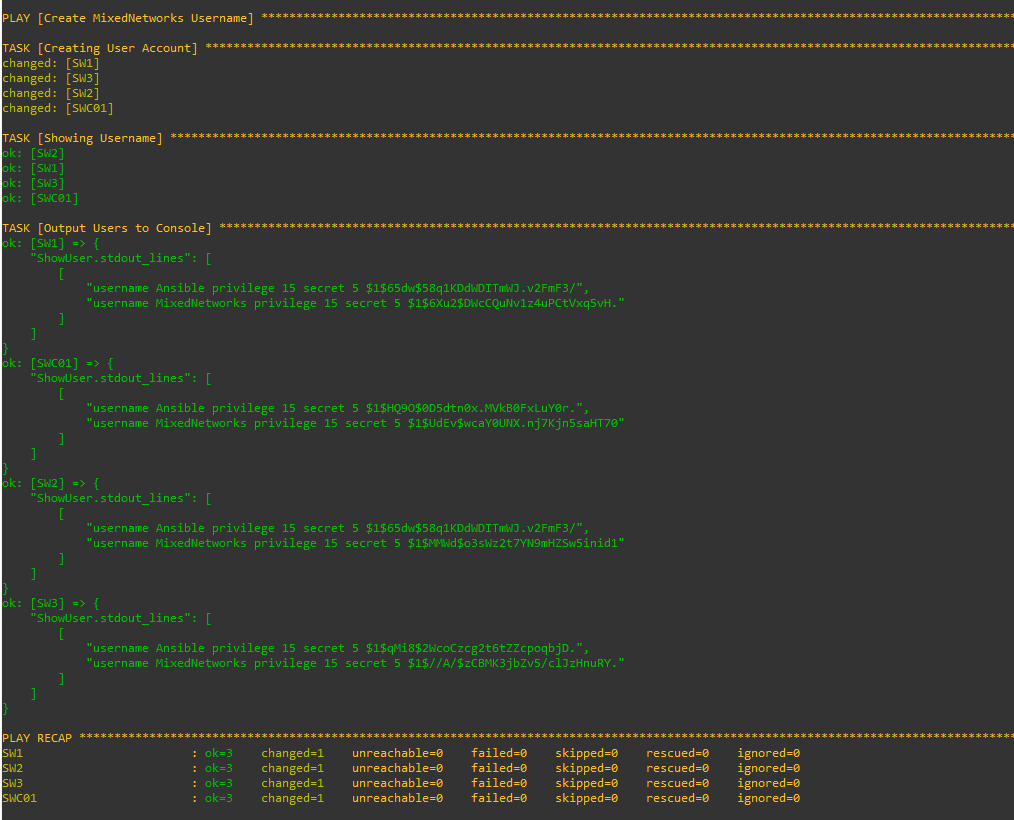
Ansible then connects to all of our devices, creates our username and then outputs the usernames configured to our console.